Locations and Agents
Within this menu, you have the ability to create and manage the settings related to Locations, Agent Groups, and Agent instances. The following section guides you through the different steps. For a more in-depth understanding of the Agent's technical details, please refer to the dedicated section in the fundamentals.
When opening the "Locations and Agents" menu in the Portal, you can see the list of all currently configured Agents. The column "Agent Status" shows if an Agent is currently available or not.
Create a Location
Each Agent has to be assigned to a specific Location and an Agent Group, whereby both are components for organizing and structuring Agents. A Location can include several Agent Groups.
To create a new location, go to the "Locations & Agents" menu in the Portal. A new window will be shown. Click the grey "New Location" button in the upper left. Another window will pop up, allowing you to set up the new Location:
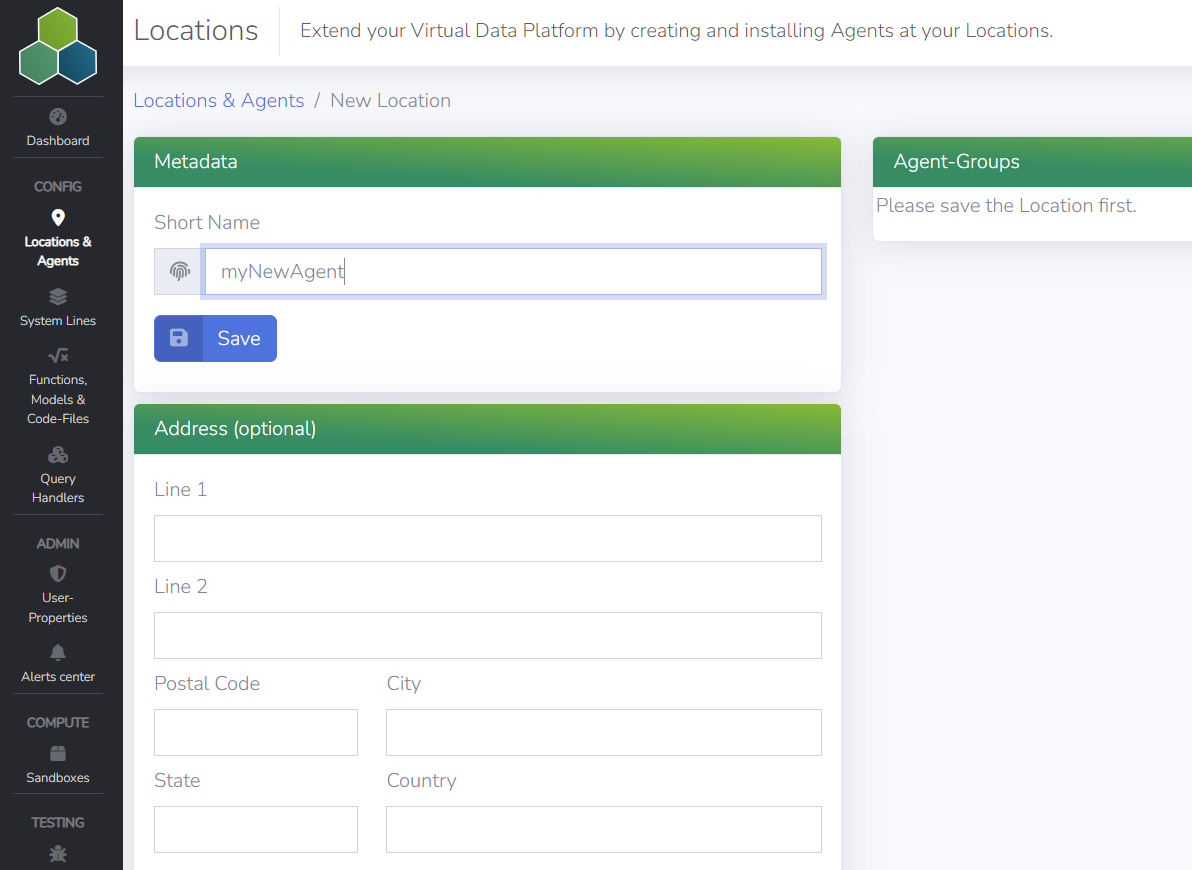
Provide a descriptive name for your Location, which should uniquely identify it. In addition, enter further details like the address, in case it can be allocated to a geographical entity. After saving the configuration, the new Location is available and new Agent Groups can be organized.
Create a Agent Group
An Agent Group groups individual Agent instances. The creation of an Agent Group is straightforward and can be done directly after initiating a Location. Just click on the grey button "New Agent Group" on the right side. In case you start in the Portal, you can find it in the "Locations & Agents" menu and then select the Location to open the "Edit Location" Window.
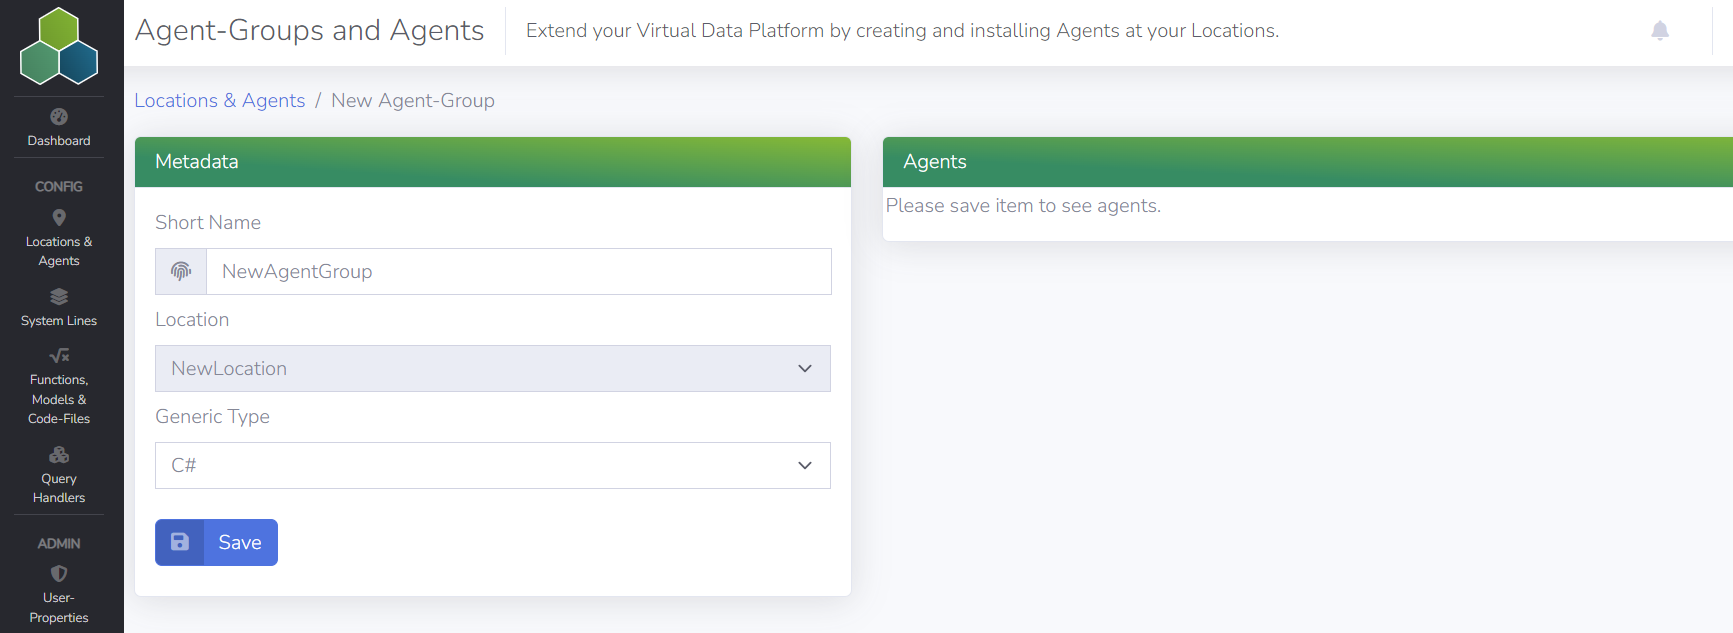
Provide a descriptive name for the Agent Group, which should be uniquely identifying it. As of now, there is no other Type but "C#". After saving the setup, further options will be displayed to maintain the Agent Group, e.g., delete or save changes as well as the Changelog. In addition, there is a graph representing the statistics of the Agent Group. On the right side there is a list of the Agents. When creating the Agent Group, a default Agent is created. You can download and install the "DEFAULT" Agent or create a new one by clicking on "New Agent".
Install Certificates
To ensure secure communication between an Agent and Virtual Data Platform, a certificate has to be installed. It has to be installed for each Agent individually. It can be found in the Portal in the menu "Locations & Agents" after selecting the Agent Group and the Agent. In the screenshot below, the "DEFAULT" Agent created in the previous step is selected:
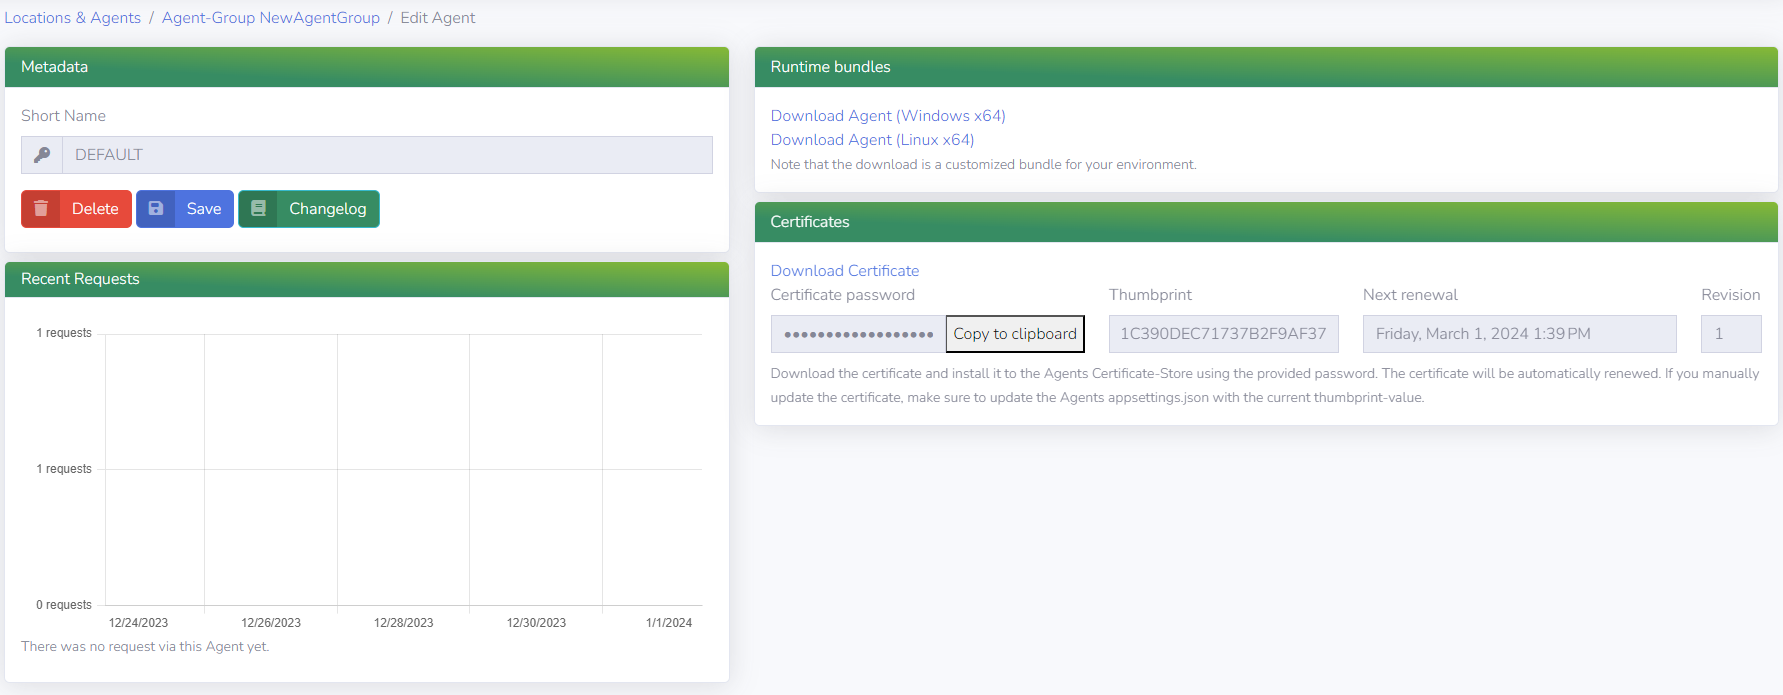
By clicking on "Download Certficate" the browser starts the download. In addition, there are further information:
- Certificate password: the password required to install the certificate on the operating system of the local machine or the server
- Thumbprint: an ID to identify the certificate
- Next renewal: the time when the certificate expires
- Revision: a number which counts the automatic updates
After the initial manual installation of the certificate, any other renewal is done automatically. In case you manually update the certificate, make sure to update the Agent's 'appsettings.json' with the current thumbprint value.
The installation of a certificate depends on the operating system. It has to be installed to the certificate store, which might be different for Windows and Linux. Both are supported.
Windows Operating System
In order to install the certificate on a local machine or a server which runs on Windows, go to the certificates store. On a local machine this can be done by select 'run' from the start menu, and then enter certlm.msc. The following window will appear:
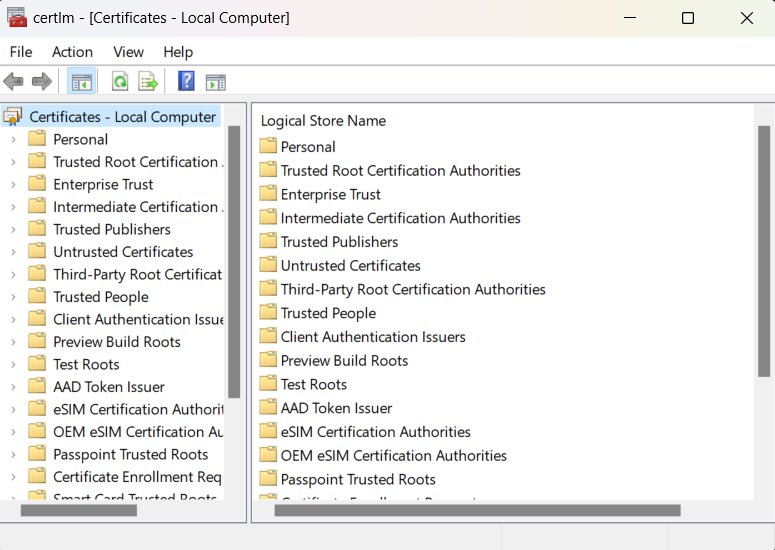
Now the certificate can be imported. Therefore, right-click on the folder where you want to install the certificate to. Another window will pop up where you can select "All tasks" and then "Import...". It should look similar to the following screenshot:
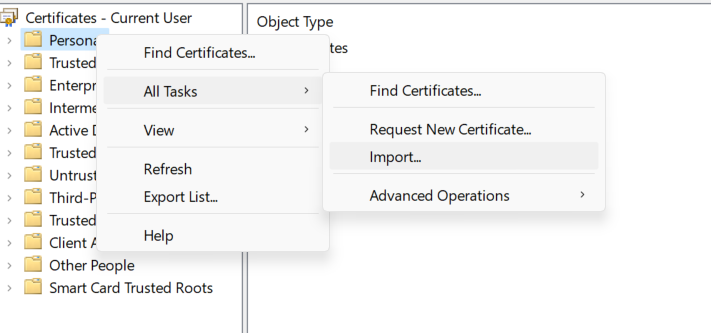
Afterwards, a wizard will be displayed. Follow the instructions shown in the wizard.
Please make sure, that the user which is used to run the Agent has read permissions for the private key of the certificate.
In case the current user is the one who also executes the Agent, please make sure that the user has the necessary rights to access the certificate:
For the final import, you need the password, which you find in the window where the certificate can be downloaded, as described above. After the certificate has been installed, the Agent can be instantiated.
Linux Operating System
In the different Linux distributions there is no consistent approach to import and install the certificate using system tools. For example in Ubuntu the default location to install certificates is the path /etc/ssl/certs.
Please contact your system administrator for further support. Alternatively, you can use the Agent executable file to handle the certificate import. This is done with command line options described in the section on running an Agent on Linux.
Install and Run an Agent
Agents are available for Windows and Linux. The executable bundle can be downloaded in the "Edit Agent" section in the Portal.

The downloaded executable bundle is zipped since it comprises up to 100 MB. The binary has to be executed on a system which has access to the network where the required source systems are located.
Windows Operating System
In Windows, the zipped bundle can be extracted and includes the following files:
README.MD: Includes some minor information about the executable.vdp-agent-win-x64-<version>-main.exe: The executable which includes all the logic.appsettings.json: Includes some specific information, for example keys and backend urls.InstallVDPWindowsService.ps1: Installs and starts the agent as a Windows Service.DeleteVDPWindowsService.ps1: Deletes the current Windows Service running the agent.
The Agent can be run as a Windows Service. For logging (starting from level Warning), the Agent, as a service, utilizes the Windows EventLog. You can set up your own monitoring tools as needed. Running the Agent as a Windows Service is recommended for productive use. Please note that these scripts must be executed from an Admin PowerShell, and the PS-Exec policy must be set to "Unrestricted" beforehand. The command for this is:
Set-ExecutionPolicy Unrestricted
The following command starts the Agent as a Windows Service by running the binary file.
./InstallVDPWindowsService.ps1
After execution of this command, the VDP Agent should be visible in the Windows Services.
Linux Operating System
In Linux, the zipped bundle includes no powershell files, only the following ones:
README.MD: Includes some minor information about the executable.vdp-agent-linux-x64-<version>-main: The executable which includes all the logic.appsettings.json: Includes some specific information, for example keys and backend urls.install-systemd-daemon.sh: Installs and starts the agent as a systemd daemondelete-systemd-daemon.sh: Deletes the current systemd daemon running the agent.
The agent executable can be started directly in the console. Please make sure that the executing user has the sufficient permissions and the executable flag is set for the file. If it is not set, you can use the following command:
chmod +x "vdp-agent-linux-x64-<version>-main"
If the Agent certificate has not been installed before, it can be done by the Agent on startup by using command line parameter --certificatefile and --password.
We recommend copying the password from the Agent download site and storing it in a file.
This file can then be used when starting the Agent.
To start the Agent, add the prefix ./ (for accessing executables) and provide the information for the certificate (if the certificate has not been installed before):
./$vdp-agent-linux-x64-<version>-main --certificatefile <pathToCertificate> --password "$(cat <pathToCertificatePasswordFile>)"
After starting the Agent one time with the options --certificatefile and --password and successfully installing the certificate you will not need these options anymore. The Agent will be able to load the certificate from then on.
When the option --certificatefile is used, the first log message will give information on the outcome of the certificate load:
Success message:
[08:12:34.567 INF] Certificate loaded and stored.
Error messages start with "Cannot load certificate" and some details on the error, e. g.:
-
Certificate thumbprint (in certificate file and in appsettings.json) do not match.
[08:12:34.568 WRN] Cannot load certificate: "Wrong certificate." -
The given password is wrong.
[08:12:34.569 WRN] Cannot load certificate: "Cannot load certificate from file (password incorrect or no certificate in file): wrong password
If you want to run the Agent as a Daemon (as background services are called in Linux), use the bash script install-systemd-daemon.sh. If you are not using systemd as init service, please contact your administrator.
Make sure to install the Agent certificate for the user you are running the daemon with. By systemd default, the Agent will run as root. The certificate can be installed for root using this command:
sudo ./$vdp-agent-linux-x64-<version>-main --certificatefile <pathToCertificate> --password "$(cat <pathToCertificatePasswordFile>)"
Run an Agent in a Docker Container
There is also the possibility to execute the Agent within a Docker Container. Therefore we recommend a simple base image like alpine:3. For further details please contact the VDP Team directly.