Initial Technical Setup
The following section will guide you through the setup steps of Virtual Data Platform (VDP) and will assist you in getting started. As VDP is a Software-as-a-Service (SaaS) solution hosted in Microsoft Azure, no software installation for the platform itself is required. Every user with an appropriate license can access the services of Virtual Data Platform. The first step is to obtain a Virtual Data Platform tenant. Afterwards, licenses can be ordered and assigned to your users.
Additionally, Virtual Data Platform can be deployed and used in a dedicated cluster. For more information on using VDP exclusively, please contact the VDP team directly.
Get your Tenant
The first step is to obtain a VDP Tenant, which needs to be initially setup by the VDP Team. The VDP Tenant is a distinct area within the productive environment that shares the same hardware with other tenants but is completely isolated in terms of content. VDP utilizes the Microsoft Entra ID for user authentication.
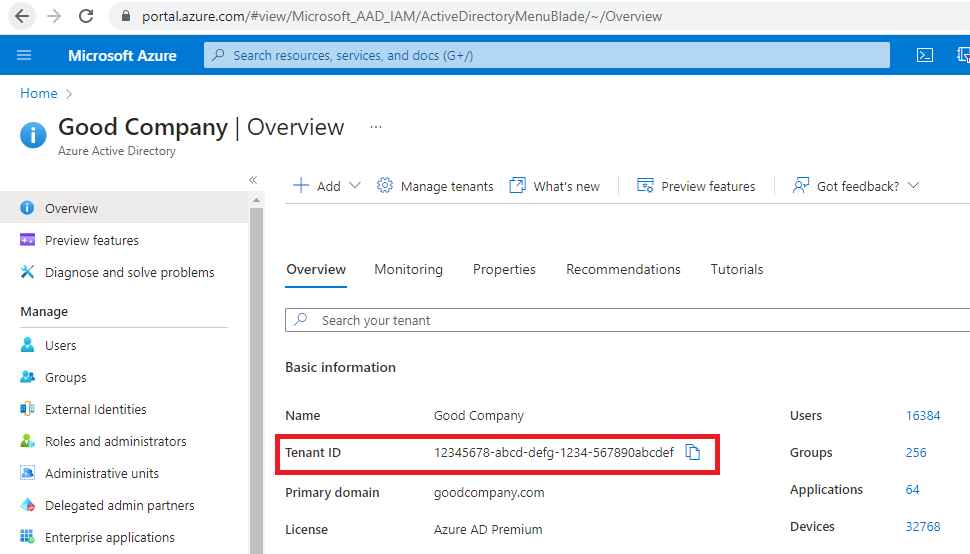
The only information required to setup a VDP Tenant is the Microsoft Entra Tenant ID. You can find your Microsoft Entra Tenant ID in the Microsoft Azure Overview. Be aware of the difference between the Microsoft Entra Tenant and the VDP Tenant.
The Tenant ID is shown in the basic information:

This is the only information required for the initial setup of your VDP Tenant. After providing this information to the VDP Team, the your VDP Tenant will be available shortly.
Subscribe to User Licenses
As already mentioned above, the functionalities of Virtual Data Platform can be accessed via different user roles. More details on the specific user roles and the licenses as well as the links to Microsoft AppSource are are provided in the section User Roles and Licenses. There you also find information about how and where to subscribe.
To be able to use Virtual Data Platform, each license and role must at least be subscribed to and assigned to once (User, Creator and Admin). This can also be done with only one user having all roles. In case you want to use the Excel App Connector, you have to subscribe to the Virtual Data Platform Add-In for Microsoft Excel as well.
You can choose the plan you need based on the required number of users and features. Once subscribed, all administrative tasks can be done within your Microsoft 365 Admin Center and the VDP Portal.
Assign User Licenses and App Connector Licenses
Assignments, reassignments, and unassignments can be managed in the Microsoft 365 Admin Center.
A description of how to assign user licenses along with links to the Microsoft documentation can be found in the section Assign User Licenses. A description of how to assign App Connector licenses is provided in section Assign App Connector Licenses.
Grant Admin Consent
For VDP, it is necessary to grant Admin Consent in Microsoft Entra ID to enable delegated access to essential resources such as Graph, SharePoint, DevOps, Dynamics, and more. This process can be completed in the Azure Portal under Enterprise Applications, where VDP requests the required permissions, and they just need to be confirmed.
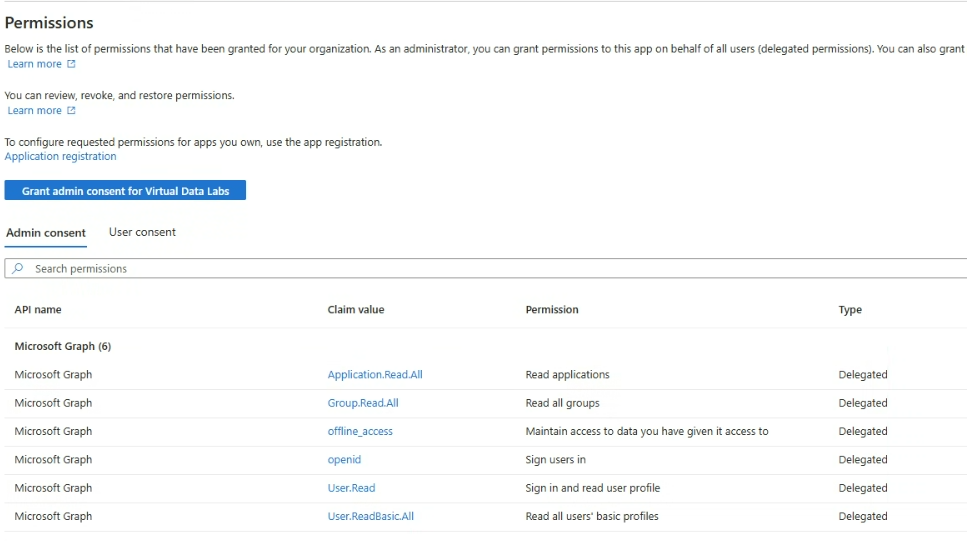
The window in the Azure Portal appears as shown below and provides information about the granted rights.

When clicking on 'Grant admin consent for Virtual Data Platform', a new window pops up. In this window, it is very important to grant the rights by selecting the option 'Consent on behalf of your organization.'
Different types of Source Systems may require different permissions. This means that access to Source Systems such as SharePoint, DevOps, or CRM must be granted separately. VDP requires a minimal set of permissions essential for its basic functionality.
The basic functionality is ensured with the following permissions:
-
Application.Read.All: Needed to read the list of granted permissions in our Enterprise Application.
-
Group.Read.All: Required for permission verification/group membership in Workspaces.
-
offline_access: Necessary for handling refresh tokens.
-
openid: Sign users in using OpenID as an authentication method.
-
User.Read: Sign in and read user profile.
-
User.ReadBasic.All: Used for username resolution in UIs (e.g., Workspaces, License Management).
All permissions are delegated, meaning VDP makes calls on behalf of a user and only with their prior authentication.
Other Prerequesites
sOther prerequisites related to specific Source Systems might also be necessary. This involves all activities on the Source System side which may require administrative rights or special knowledge with respect to technology or data engineering. For details, please refer to the specific documentation in the source system connections section.
Next Steps
Now you are ready to configure VDP for the first time. The first steps require to configure a Location and run an Agent. This is described in the next section.